
 Yes. The Atheist said it, “Merry Christmas!” So, what? It’s Christmas Eve and it’s appropriate. I went to Walmart today to get an HDMI cable and exchanged the greeting with quite a few people today. On the 21st, we celebrated Winter Solstice at our house.
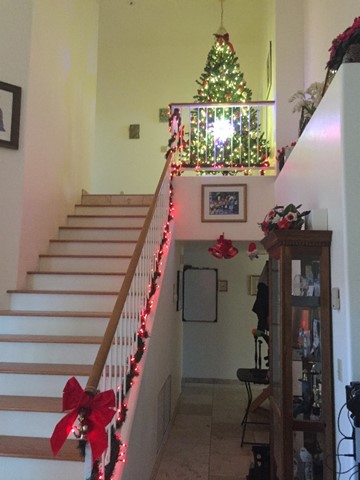
It was a great party. There were not one but two Christmas trees in the house. One was decorated with only red and gold ornaments and white warm LED lights. The other was rather eclectic with colored lights and a wide variety of colors and types of ornaments. Both are artificial and have been with us for over 10 years. But isn’t the holiday a bit artificial?
The annual celebration of the birth of Jesus Christ was placed on the calendar to displace the pagan celebrations that preceded the rise of Christianity. The first celebration of Christmas on December 25th was in 336 CE. There was no specified date in the Bible, so the Roman Emperor Constantine decided to put it on the 25th of December. It’s a wonderful time to celebrate especially in the Northern Hemisphere and the farther you get away from the Equator the more the celebrations are appreciated.
December 25th is roughly the time of the Winter Solstice, the shortest day of the year. Roman midwinter celebrations were already happening during the Winter Solstice. Two notable celebrations are Saturnalia and Dies Natalis Solis Invicti. The Winter Solstice is a solar event and represents the shortest day of the year, in the northern hemisphere of the Earth. In Tucson the shortest day of the year this year was on the 21st of December. It was 10 hours, 2 minutes, and thirty-one seconds between sunrise and sunset. On the 25th, the day was 10 hours, two minutes, and 42 seconds. The point here is that the length of the day changes very slowly around the Winter Solstice.
The literal meaning of solstice is “the Sun stops.” The Sun doesn’t stop, of course but if you were to observe the height of the Sun above the horizon at midday every day, you’d notice that during the Winter Solstice that the height would stop decreasing each day.
On Christmas day, we’ll hike, watch a movie, and eat at a Chinese buffet. Life doesn’t get much better than that in in the Southwest.


 are very scary to some people. At least one person messaged me to tell me that her
 Yes! “It” is done. Please check out the
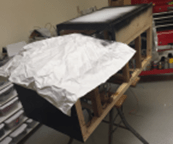
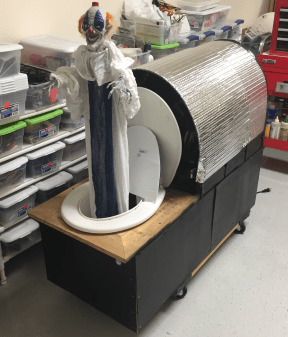
 Skinning the prop involved cutting repurposed political signs, attaching the pieces to the framework, and painting them black. The “culvert” is made out of silver colored insulation material laid over bent fiberglass rods. The fiberglass rods are perfect in all ways but one. They are light and easy to bend into a smooth pipe-like shape. What is less than ideal is the fact that they must be handled with gloves. Fiberglass splinters are sharp, painful, and difficult to find and remove.
 Greetings Halloween Geeks and Geeks adjacent! Here is a picture of the IT prop “in-the-bones.” In other words, there is no skin. When I last reported I had everything working on the bench—separately. Turns out that is an important distinction. Everything worked and when assembled, it didn’t. It’s like reverse synergism. I anticipated a problem with mating the store bought jumping spider with the homemade portion. I did encounter that problem and found a solution quickly (and elegantly). Elegantly in that the finished prop will no longer require a set of AA batteries be installed in the spider. The solution was to split power from the main supply, regulate it, and provide it to the spider only when required. It took a bit of fiddling but now works fine. However, I didn’t anticipate that the noisy auto antenna motor would interfere with the audio amplifier.
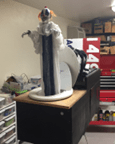
 seems to fit the situation. Once the spider backs down, the tray moves the spider back and the clown rises once again from the toilet. Beautiful! Except, the voice only worked once and was silent in subsequent cycles. WTF?
 Before I became an electrical engineer, I was an experienced technician. It knew it would take every skill I had to find what was causing this situation. Isolating the audio board power supply didn’t work. Isolating the triggering connection to the audio board also didn’t work. I reasoned that there must be radio frequency interference from the auto antenna actuators.
 I finished the last installment of “Building IT” with “what’s next?” What was next was to wire the circuit boards and test their functions. The picture here doesn’t look very different from yesterday but that’s the nature of projects. In the beginning, change is obvious. First there is nothing then there is something. In the middle of the project very little seems to change. It’s like the project absorbs work.
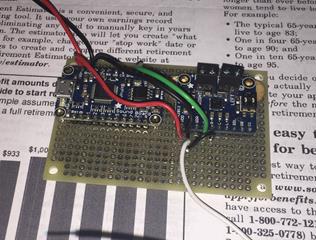 Greetings! In the 11 days since the last installment of “Building IT” a lot has happened but that doesn’t mean that the work has stopped. Building IT is quite a project. almost to the same level as the first pneumatic clown prop that I built. In some ways IT is a step back. When I retired in 2008, I thought that Halloween was going to be great but it wasn’t. I had “Jack” but the clown prop that I built was a horrible failure. For one thing, I started too late. The clown was supposed to come out of a box. It used and electric actuator that didn’t work well. He was slow and boring. Even so, the Halloween was still fun. I still had my trustworthy “Jack.”
 Building IT is quite a project and projects need to be divided into individual tasks. Some tasks are easy or familiar because I’ve done them before. Some tasks are unfamiliar and challenging. These are the “hard stuff.” On the other hand, there are familiar tasks that must be accomplished first. For example, I’ve built props in the past and building a box is something that might be considered easy or familiar. However I can’t mount the linear actuator which is rather challenging without the box to mount it to.
 The IT build continues. I spent some quality time in my workshop today and got to fiddle a bit with my newest Halloween prop. It is usual for these types of projects to break things first and I had to tear up my new clown decoration. It was necessary to remove his “bones” so that the arms would collapse when sinking into the toilet. It took a bit of work but I got it to function. It’s going to take some finishing work but at least now I know that what I’m trying to do is at least possible.
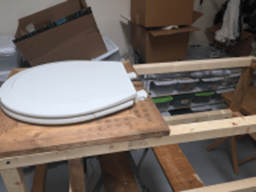 I had to counter balance the toilet lid. The automotive power antenna that I’m using to raise the clown isn’t very strong. The clown’s head will push the lid open. A cord attached to the clown’s neck will make the lid close down when the antenna retracts. It would have been easy to use the clown decoration as it came out of the store if I didn’t require it to pass through a toilet seat but the seat was available and my builds are more fun if I upcycle or at least save material from going to the landfill. Besides, I think the toilet seat adds to the idea that the clown resides in the sewers.
 The normal (starting) position of the clown will be standing in the toilet. Once triggered, the clown will drop down and make room for the jumping spider to slide over the toilet seat. It will then jump at the observer. You can see a video of the clown sinking and rising
  It looks a bit like I’m building an outhouse. I had a good building day. It started with drawing up plans—the best laid plans of mice and men…as they say.
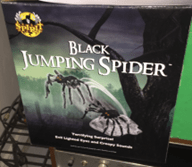
 The first priority was to get an overall size for the box. The prop will contain a clown that ducks down in a toilet seat. It will also include a jumping spider that I bought from the Spirit store. The front of the prop will have the toilet seat and clown. The rear will have the jumping spider. The height of the box was determined by the dimensions of the linear actuator that will lift the clown and toilet lid. The width is determined by the size of the jumping spider’s base and the length is determined by the distance that the spider will move forward before it jumps at the viewer.
 I had enough 1×4 lumber on hand to build the frame like structure that will hold the toilet seat. Once again the compound miter saw came in handy along with the biscuit joiner. I applied glue and went out to do other things.
 Everything was going so well up to this point but it was time to prove out the old adage about “best laid plans.” Adjustments will have to be made. Originally, I was going to have the spider come out of the rear of the prop at an angle but trial fitting the remaining components and considering the strength of the automotive radio aerial that I’m using as a linear actuator, caused me to revisit the plan. It’s not unusual, of course. Also, I know with confidence that I can make a Spirit prop move horizontally since I built a doghouse for a jumping dog prop that I bought from the Spirit store in 2015. Besides, it will make the build simpler.
 The final steps will involve automating the prop after all the parts are assembled and manually tested.
 This should be the first part of a series. Here are some of the items I’ve collected
  so far for the build: